Understanding the Grid Nature of a Dialog Box
Description
While Xdialog does a pretty good job of spacing out the controls you define in a logical way, you will typically want to tweak the default layout of a dialog box. The controls on an Xdialog are laid out in much the same way as text is laid out in a document that you create on your word processor (actually a word processor that does not have automatic word-wrap). In a word processor, the characters appear on the line, starting at the left and moving to the right until you press Enter to move to the next line (remember, we are talking about a pretty lame word processor that does not have an automatic word-wrap feature). Then, text appears on the next line until you press Enter to move to the third line and so on. You can line up columns of text in your word processor by using the Tab key.
Another analogy that will help you understand how Xdialog dialog boxes are laid out is an HTML table, which has cells within a grid of rows and columns. An HTML table allows any individual cell to contain another table. There is no limit to the number of times a sub-table can be embedded in a table. Similarly, an Xdialog dialog box is comprised of cells in a grid of rows and columns. Like an HTML table, the cells in an Xdialog grid can in turn be subdivided into a grid of rows and columns. The following diagrams help explain this concept further. The simplest Xdialog has a single cell that occupies the entire dialog box: As you saw earlier, we use the ';' character in our examples to move to a new line. The ';' is an Xdialog directive to divide a single cell dialog into a two cell dialog (one column, two rows). For example, consider the following Xdialog:
result=ui_dlg_box("Title",<<%dlg%
Hello World ;

%dlg% )
You can decompose this script as follows:
result=ui_dlg_box("Title",<<%dlg%- Hello World ;
%dlg% )
We also saw earlier that the '|' directive was used to divide a cell into two columns. For example, consider the following script:
ui_dlg_box("Information",<<%dlg%
First Name: |.20firstname;
Last Name: |.20lastname;
Occupation: |.30occupation;
<&OK>
%dlg%)
You can decompose this script as follows:
result=ui_dlg_box("Title",<<%dlg%- First Name:
.20firstname
- Last Name:
.20lastname
- Occupation:
.30occupation
- <&OK>
%dlg% )
You can achieve the exact spacing of controls on a dialog by dividing up the dialog into the appropriate logical grid, and then placing the controls in the appropriate cells. For example, the following diagram shows how you might logically divide a dialog into a grid of multiple rows and columns, and how some of the cells in the grid might in turn be divided into rows and columns.
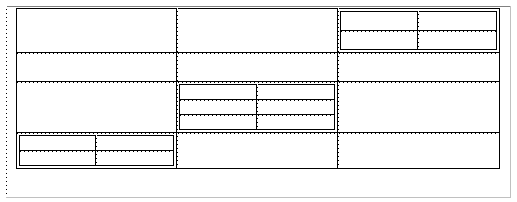
While the above diagram would represent a pretty complex dialog box, it does show you how you could go about getting your dialog to look just the way you want. As we have seen, the basic directives for dividing a cell into rows and columns are the ';' and '|' directives. In this lesson you will learn more about these directives, and you will also learn about the {region} {endregion}, {row} {endrow}, and {col} {endcol} command pairs. In addition, in this lesson you will learn about the spacing controls that govern how much space Xdialog allocates between the columns and rows in the grid. You will also learn how to define the margins for the dialog and you will learn how to draw lines and frames on the dialog.
Limitations
Desktop applications only
See Also